Battery switch on travel trailer function is crucial for managing your RV’s power. Understanding how to use your battery switch safely and effectively is key to enjoying worry-free camping trips. This guide breaks down the different types of switches, how they work, troubleshooting common problems, and even upgrading your system. Let’s get started!
Whether you’re a seasoned RVer or a newbie, mastering your battery switch is essential. This guide covers everything from identifying your switch’s components to performing basic maintenance. We’ll explore the different types of switches, their pros and cons, and how to avoid common mistakes that can drain your batteries or even cause damage. By the end, you’ll be confident in managing your travel trailer’s power.
Understanding Battery Switches in Travel Trailers
Properly managing your travel trailer’s power relies heavily on understanding your battery switch system. This system allows you to control the flow of power from your batteries to your trailer’s appliances and systems, and importantly, to isolate them when necessary. Knowing how your battery switch works is crucial for preventing damage and ensuring a smooth camping experience.
Types of Battery Switches
Travel trailers utilize several types of battery switches to manage power distribution. The most common are single-pole, double-pole, and battery isolators. Each offers a different level of control and protection.
Single-Pole Battery Switches
A single-pole switch controls the power from a single battery. It’s typically a simple on/off switch that connects or disconnects the battery from the trailer’s electrical system. The wiring is straightforward: one wire from the battery’s positive terminal connects to the switch, and another wire from the switch connects to the positive bus bar or distribution point in the trailer.
The negative terminal of the battery is usually directly connected to the trailer’s chassis ground. This offers basic control but lacks the ability to switch multiple batteries or isolate them from each other.
Double-Pole Battery Switches
Double-pole switches provide more control, often managing two batteries (a house battery and a starting battery). Each pole controls a separate battery, allowing you to isolate or connect either or both to the trailer’s electrical system independently. The wiring involves two sets of positive wires from each battery, each connected to a separate pole of the switch, and two outgoing wires to the trailer’s electrical system.
Again, negative terminals are typically grounded directly to the chassis. This allows for more efficient power management and prevents accidental draining of one battery by another.
Battery Isolators
Battery isolators are sophisticated electronic switches that automatically manage the charging and discharging of multiple batteries. They typically use diodes or relays to prevent the batteries from draining each other. They are particularly useful in setups with a starting battery (for the tow vehicle) and a house battery (for the trailer). The isolator ensures the alternator charges both batteries when the vehicle is running, and prevents the house battery from draining the starting battery when the vehicle is off.
So, you’re planning a trip? Awesome! First things first, get yourself sorted with travel insurance. Check out Aon travel insurance for some solid options; they’ve got a range of plans to suit different needs. And speaking of trips, if you’re hitting the road in a travel trailer, understanding your battery switch on travel trailer function is super important to avoid getting stranded.
Knowing how to manage your power is key for a smooth and enjoyable adventure!
Wiring involves connecting the batteries to the isolator, and the isolator then connects to the charging source (alternator) and the trailer’s electrical system.
Identifying Battery Switch System Components
Identifying the components is the first step to understanding your system. Begin by locating the battery(ies) themselves, usually under a compartment at the front or rear of the trailer. Trace the positive cables emanating from the batteries. These will lead you to the switch(es) – these are often located near the batteries or within a central electrical panel. Examine the switch markings; they often indicate which battery or circuit they control.
Finally, trace the outgoing wires from the switch to identify where they connect to the trailer’s power distribution system.
So, you’re planning a trip? Awesome! First things first, grab some travel insurance. Check out aon travel insurance for options; they often have good deals. Then, if you’re hitting the road in a travel trailer, knowing your battery switch on travel trailer function is crucial. Understanding how to manage your power is key to a smooth trip, preventing those frustrating dead-battery moments.
Happy travels!
Comparison of Battery Switch Types
| Switch Type | Advantages | Disadvantages | Typical Application |
|---|---|---|---|
| Single-Pole | Simple, inexpensive | Limited control, only one battery | Small trailers, single battery systems |
| Double-Pole | More control, manages two batteries | More complex wiring | Most travel trailers with house and starting batteries |
| Battery Isolator | Automatic charging, prevents cross-drain | More expensive, potentially more complex installation | Travel trailers with multiple batteries requiring efficient charging |
Operating the Battery Switch
Switching your travel trailer’s battery banks is a crucial task for managing power and extending your off-grid adventures. Understanding the process, safety precautions, and potential consequences is key to preventing damage to your RV’s electrical system and ensuring a safe camping experience.This section details the procedure for safely switching between your house batteries (powering interior lights, appliances, etc.) and your chassis battery (powering engine starting).
We’ll cover safety measures and the potential repercussions of improper operation.
Battery Switching Procedure
The exact method for switching your batteries will vary slightly depending on the type of switch installed in your travel trailer. Common types include rocker switches, rotary switches, and more complex digital systems. Consult your owner’s manual for specific instructions for your model. However, the general principles remain the same. Before initiating any switch operation, always ensure that your hands are dry and that you’re working in a well-lit area to avoid accidents.Typically, you’ll find a switch labeled with positions for “Both,” “House,” “Chassis,” and potentially “Off.” The “Both” position connects both battery banks, allowing charging from the alternator or shore power to both.
The “House” position connects only the house batteries, providing power for your living space while isolating the chassis battery. “Chassis” connects only the chassis battery, essential for starting the vehicle. The “Off” position disconnects both batteries completely.To switch to the “House” batteries, move the switch to the “House” position. To switch to the “Chassis” battery, move the switch to the “Chassis” position.
To charge both simultaneously, select “Both.” Always ensure the switch is firmly in the desired position.
Safety Precautions During Battery Switch Operation
Working with batteries involves potential risks. Always observe these precautions:
- Wear safety glasses to protect your eyes from potential sparks or acid splashes.
- Avoid touching the battery terminals while the switch is operating.
- Ensure proper ventilation to prevent the buildup of explosive hydrogen gas, which is a byproduct of battery operation.
- Never attempt to force the switch. If it feels stiff or difficult to move, consult a qualified technician.
- If working near the batteries, wear gloves to protect your hands from potential corrosion or acid.
These safety measures minimize the risk of injury or damage to your equipment.
Consequences of Improper Battery Switch Operation
Incorrectly operating the battery switch can lead to several issues, including:
- Draining Batteries: Leaving both batteries connected while running high-draw appliances might drain the chassis battery, leaving you unable to start your vehicle.
- Overcharging: Improperly switching batteries might lead to overcharging one bank while undercharging the other, potentially damaging the batteries.
- Electrical Damage: Incorrect switching could cause short circuits or damage to sensitive electronics within your RV.
- Fire Hazard: In extreme cases, improper handling could lead to sparks and a potential fire hazard, especially near flammable materials.
Battery Switch Operation Flowchart
[A descriptive flowchart would be placed here. Imagine a simple flowchart with rectangular boxes for steps and diamond shapes for decisions. It would start with “Prepare to Switch,” proceed to “Verify Switch Position,” then have a decision point “Desired Battery Bank Selected? Yes/No.” A “Yes” path leads to “Switch to Selected Position,” followed by “Verify Position & Secure,” and finally “Complete.” A “No” path would loop back to “Verify Switch Position.” Safety symbols like eye protection glasses, gloves, and a warning triangle could be incorporated.]
Battery Switch and Electrical System Integration
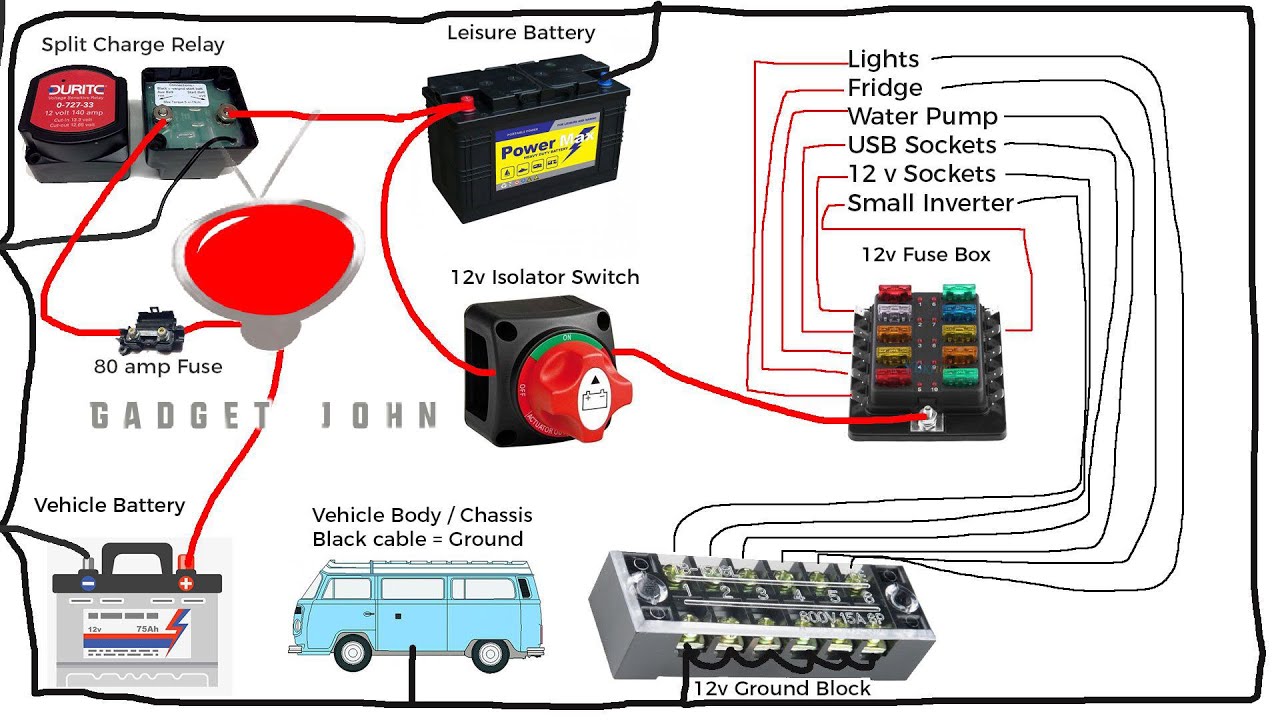
The battery switch is the central control point for your travel trailer’s DC power system. Understanding its interaction with other electrical components is crucial for safe and efficient operation. This section details how the switch manages power distribution and the implications of different wiring setups.The battery switch acts as a gatekeeper, controlling the flow of power from your house batteries to the various 12-volt appliances and systems within your RV.
When the switch is in the “on” position, power flows from the batteries to the distribution panel, powering lights, water pumps, and other DC devices. Turning the switch to “off” completely disconnects the house batteries, preventing unwanted drain and protecting your battery from deep discharge. This is especially important for extended periods of storage.
Wiring Configurations and Their Impact
Different travel trailers employ varying wiring configurations, influencing how the battery switch functions. A simple system might have a single switch directly controlling all 12-volt circuits. More complex setups may incorporate multiple switches, perhaps separating essential systems (like the propane detector) from non-essential loads to allow for limited power even with the main switch off. Some RVs also include a “battery disconnect” switch separate from the main battery switch, offering an additional layer of safety.A common configuration involves a single battery switch controlling all 12-volt circuits through a distribution panel.
The panel acts as a central hub, routing power to individual circuits via fuses or circuit breakers. This setup simplifies troubleshooting, as a blown fuse or tripped breaker isolates a specific circuit without affecting the entire system. More complex systems might incorporate multiple switches or relays, allowing for selective control of different electrical loads, such as separate switches for lights, water pumps, and other accessories.
Typical Travel Trailer Electrical System Diagram
Imagine a simple diagram. At the top, we have the house batteries (two 12V batteries connected in parallel for increased capacity). From the batteries, a heavy-gauge wire runs directly to the battery switch. This switch is depicted as a simple on/off toggle. From the switch’s output, another heavy-gauge wire runs to the main distribution panel.
The distribution panel is shown as a box with several smaller circuits branching off, each protected by a fuse or circuit breaker. These circuits then lead to various 12-volt appliances throughout the trailer – the water pump, interior lights, and perhaps a 12V refrigerator. A separate wire may run directly from the battery to essential systems, like the carbon monoxide detector, bypassing the main battery switch for continuous operation.
Note: This is a simplified representation. Actual wiring can be far more complex, particularly in larger or more modern RVs. Always consult your owner’s manual for specifics regarding your trailer’s electrical system.
Upgrading or Replacing the Battery Switch: Battery Switch On Travel Trailer Function

Upgrading your travel trailer’s battery switch can significantly improve its functionality and longevity. A faulty or inadequate switch can lead to electrical problems, potentially damaging your appliances or even creating a fire hazard. Choosing the right replacement or upgrade depends on your trailer’s electrical system and your power needs.
Battery Switch Upgrade Options, Battery switch on travel trailer function
Several options exist for upgrading your battery switch, each with its own advantages and disadvantages. Consider your budget, electrical system complexity, and future expansion plans when making your choice.
- Standard Rotary Switch: These are the most common and affordable type. They offer simple on/off switching for multiple batteries. However, they often lack features found in more advanced models.
- Heavy-Duty Rotary Switch: Built for higher amperage loads, these switches are more robust and suitable for larger trailers or those with extensive electrical systems. They are generally more expensive than standard rotary switches.
- Remote Battery Switch: These allow you to control your battery from a convenient location inside your trailer, eliminating the need to access the battery compartment every time you need to switch power sources. They offer added convenience but increase the overall installation cost.
- Digital Battery Switch: Offering precise control and monitoring capabilities, these switches often include features like voltage displays and low-voltage alerts. This advanced technology comes at a higher price point.
Comparing Battery Switch Models
The best battery switch for your travel trailer depends on several factors. Here’s a comparison of common features and benefits:
| Feature | Standard Rotary | Heavy-Duty Rotary | Remote | Digital |
|---|---|---|---|---|
| Cost | Low | Medium | Medium-High | High |
| Amperage Capacity | Moderate | High | Variable | Variable |
| Convenience | Low | Low | High | High |
| Monitoring Capabilities | None | None | Limited | Extensive |
Replacing a Battery Switch: A Step-by-Step Guide
Replacing a battery switch is an electrical task and requires caution. Always disconnect the negative battery terminal before beginning any work.
- Disconnect the Battery: Disconnect the negative (-) terminal of your battery. This is crucial for safety.
- Remove the Old Switch: Carefully remove the old battery switch from its mounting location. Take note of the wiring configuration before disconnecting any wires.
- Prepare the New Switch: Mount the new battery switch in the same location as the old one. Ensure it’s securely fastened.
- Reconnect the Wiring: Connect the wires to the new switch, matching the configuration of the old switch. Double-check all connections before proceeding.
- Reconnect the Battery: Reconnect the negative (-) battery terminal.
- Test the Switch: Turn the switch on and off to verify its functionality. Check all circuits to ensure they are working correctly.
Selecting a Suitable Replacement Battery Switch
When selecting a replacement battery switch, several considerations are important. The amperage rating should match or exceed the amperage draw of your trailer’s electrical system. Consider the number of batteries you have and whether you need features like remote control or voltage monitoring. Consult your travel trailer’s manual or a qualified technician for guidance if you are unsure about the specifications of your existing system.
A higher amperage rating provides a safety margin for future upgrades or additions to your electrical system. For example, a trailer with a 100-amp system might benefit from a 150-amp switch to accommodate potential future additions like an air conditioner or inverter.
Mastering your travel trailer’s battery switch is a simple yet powerful way to enhance your camping experience. By understanding its function, performing regular maintenance, and knowing how to troubleshoot common issues, you can ensure a reliable power supply for all your onboard appliances. Remember, safety first! Always disconnect power before working on any electrical components. Happy travels!
Question Bank
What happens if I leave my battery switch on “off”?
Leaving your switch off completely disconnects both your house and chassis batteries, preventing any power from reaching your appliances or lights.
How often should I check my battery switch for corrosion?
Inspect your battery switch and connections at least once a year, or more frequently if you live in a humid climate.
Can I use a battery switch to charge both batteries simultaneously?
Yes, most switches allow for charging both batteries at once. However, some configurations might require separate chargers.
My battery switch is stuck. What should I do?
Try lubricating the switch mechanism with a penetrating oil. If that doesn’t work, you may need to replace the switch.
